

How To Build A 20 Gallon Copper Still
This guide will teach you lot how to build a 6 Gallon Kentucky style copper pot still. This size is perfect for anyone interested in home distilling and tin can be constructed by anyone with a general knowledge of soldering.
If your tired of making the same old tiresome neutral spirits with your reflux notwithstanding and are looking to make a tasty traditional rum or whiskey moonshine this yet design is for yous.
This still program is more than hard so most other plans. If you're not up to building it check out these 5 Gallon Copper Stills on Amazon. Tin't shell the toll and their well congenital. When I built mine it took me 30 hours and $200 in materials. The sail of copper wasn't cheap but I really enjoyed building my own Pot all the same.
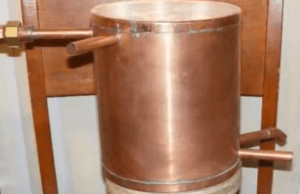
To get started allow'due south wait at what we're going to build. Beneath is a movie of the Pot withal we're going to build. This all the same was designed by Sherman Owen so a special cheers to him for posting his blueprint and making the video's I've shared.

You will need the following Materials and Tools:
- Half Sheet of Copper – 3 ft past 4 ft ( use 18 gauge copper) Amazon has some reasonable priced copper sheets
- Gyre of Solder – Endeavor to go agree of a whorl of 95/five tin/silverish is the best and stay away from anything with cadmium/antimony or lead in information technology.
- Rivets – stainless steel or copper
- ane/4 " copper tubing – 8 ft should exercise
- 1/2 " copper pipe – 3 ft
- 1/2 " Brass connector (female person and male ends )
Tools Required
- Solder Gun (accident torch) with Mapp Gas
- Rivet Gun
- Tin Snips
- File ( for smoothing out edges and burrs )
- Hammer
- Scissors
- Record
- Pencil
- Ruler
- Compass
- Pliers
Step by Pace Instructions to Build the Pot Nonetheless
Step 1 – You lot will demand to trace the below layout on your sheet of copper. To practice this print the layout from this pdf file: 6 Gallon Copper Pot Still Template or if y'all want a larger even so use the 12 Gallon Copper Pot However Design Plan Template. This file contains 28 pages that should exist printed and assembled these are to size for the half dozen Gallon However. Make sure your printer is ready to "print actual size" . For full associates instructions see the pdf file.
Step two – Cut out the shapes from the assembled template and then suit onto the copper sheet as seen below.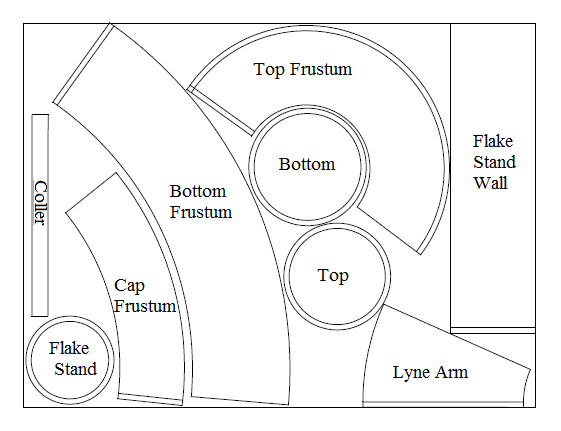
Step three – Trace the shapes onto your sheet of copper with a pencil and then cut out shapes with your tin snips
Making the Meridian and Bottom Pans for the Pot Notwithstanding and Condensor
Step i – Get-go with the Bottom piece. This will be your Bottom pan of the still. Find the center of the circle using a ruler and then using the compass scribe the perimeter of the pan with the compass. This should be fix in i/ii " from the edge.
Step two – Using a pair of pliers create ruffles forth the unabridged perimeter of the sheet using the scribed line every bit a guide
Pace 3 – Using a hammer ( flat trunk work hammer works best ) tap the ruffled border so that information technology comes to a 90 degree bend.
Footstep four – Rut the pan with a blow torch you should use Mapp gas not propane. Heat it until it turns a dark red. Piece of work your way around the entire perimeter of the pan. This will remove the piece of work hardening from the copper ( aka the bends and dents).
Pace 5 – Get your hammer back out and re work the pan border so that information technology is at a perfect 90 degrees to the lesser of the pan.
Step 6 – Get your blow torch dorsum out and estrus the entire pan upwards once again to remove the work hardening we just introduced with the hammer. Heating the pan will slightly warp the bottom this can easily be flattened by mitt or with a rubber mallet on a shine flat surface.
Step seven – Echo this process for the Height pan and Flake stand up
Hither is a video that shows the Pan being built
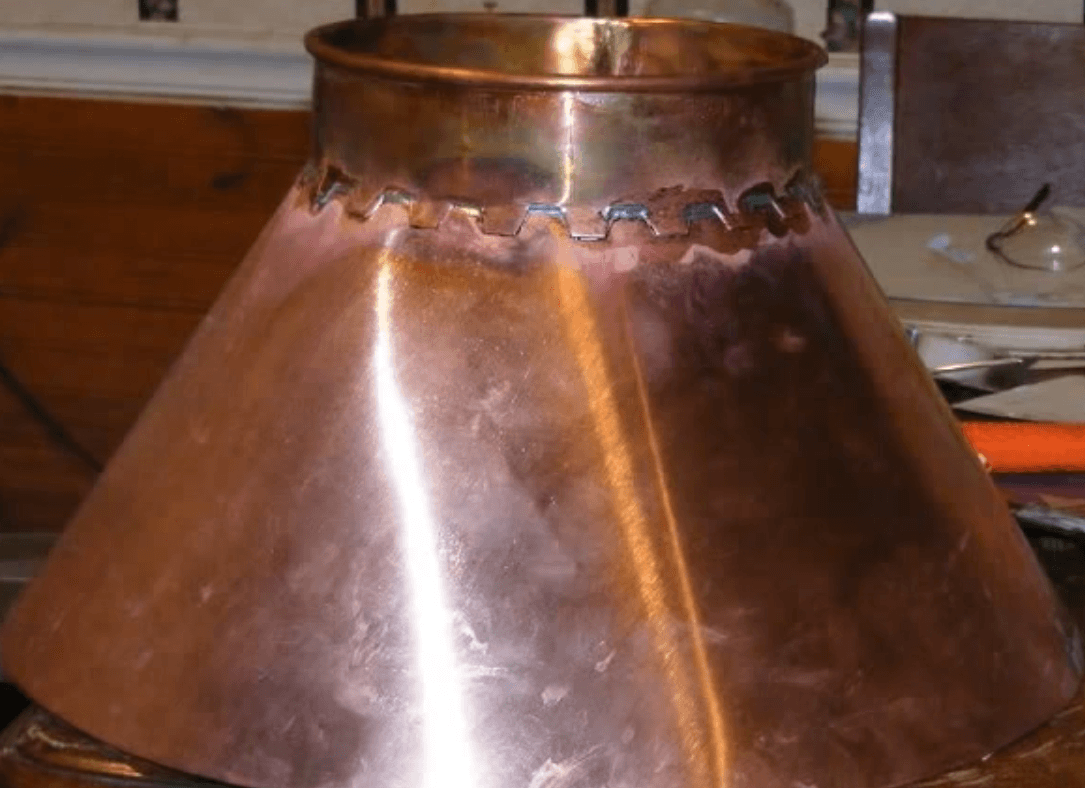
Building the Frustum For the Pot Still
There are three frustums in this pot withal design these include the top, bottom and cap frustum that need to be assembled. Follow the beneath instructions to do this ( * Note yous tin can besides build the scrap stand wall following these steps ) :
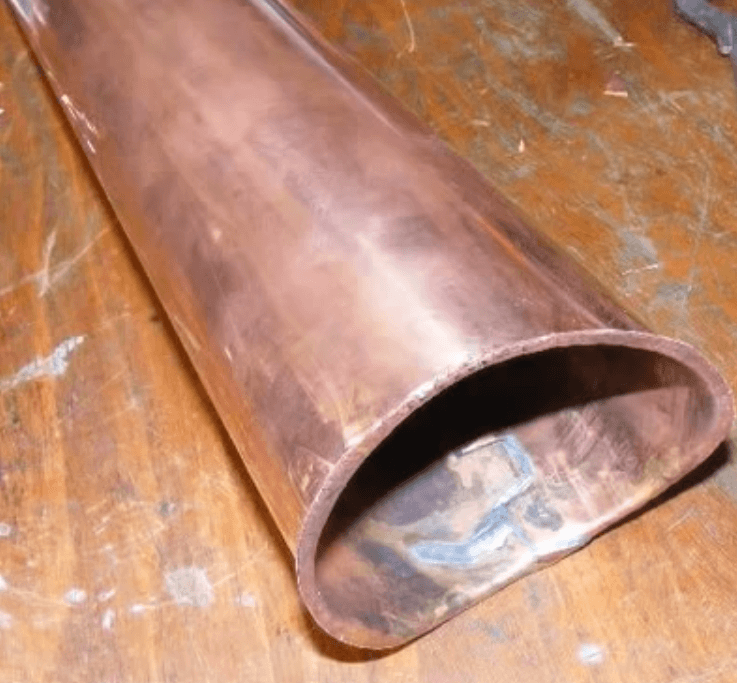
Pace 1 – Let's beginning with the bottom frustum. Place a metal rod in the vice snug it tight, we volition use this to shape the copper canvass we cut out for the bottom frustum. Slide the sheet from left to right over the rod while placing downward force per unit area on the sail. This activity should commencement to shape the copper sheet into an arc.
Step 2 – Employ the lesser pan equally a guide for the necessary curvature of the Frustum by placing information technology inside the Pan. You should take roughly a i\2 " overlap on the seam of the Frustum. Clamp the acme of the seam in place and mark the bottom overlap while its sitting snugly in the bottom pan.
Stride 3 – Remove lesser pan and clamp lesser of frustum on mark.
Stride iv – Using a ruler and a pencil mark the holes for the rivets along the seam of the Frustum. Space the rivets ane inch on center along the entire length of the seam.
Footstep five – Drill out holes for rivets and rivet in identify.
Check out this video which prove's the process of building the Frustum for the pot still.
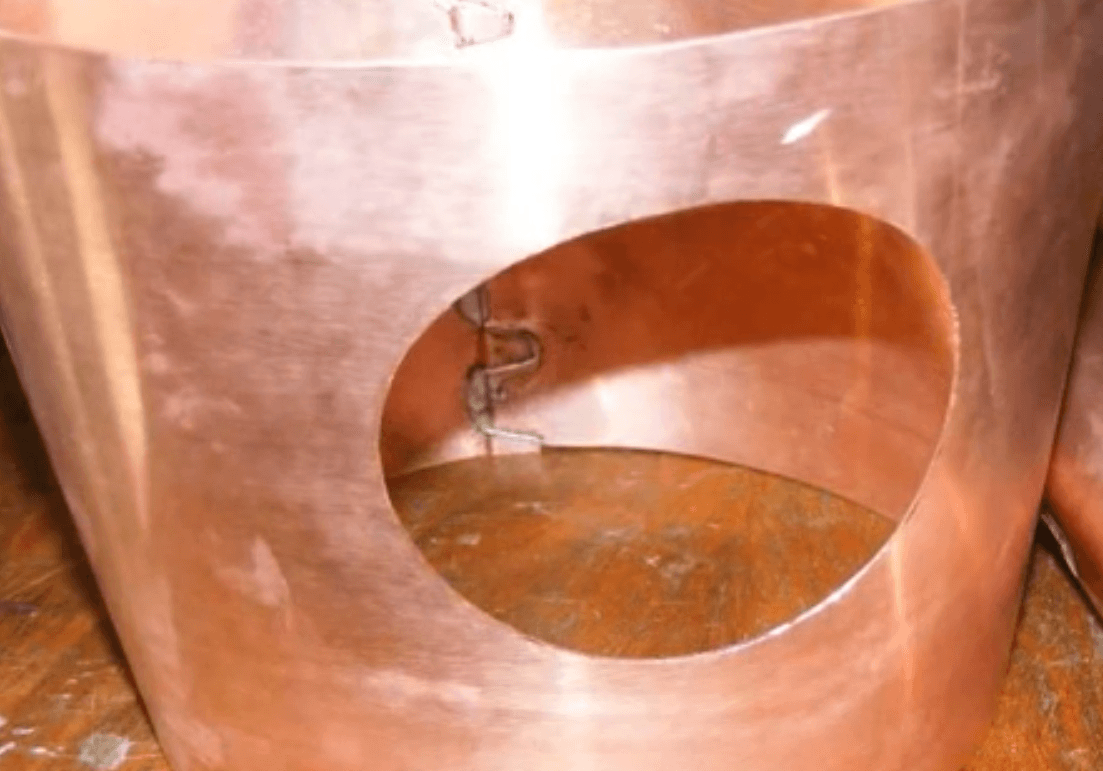
Step 6 – Repeat these steps for the height and cap frustum and collar. Go along in mind yous volition need to drill a hole in the cap frustum before edifice it for the lyne arm to seat into.
Assembling All The Parts
Its fourth dimension to gather all the pieces to make the pot however.
Footstep i – Take the bottom pan and slide the bottom frustum inside the pan.
Step 2 – Rivet bottom pan in place.
Stride 3 – Repeat these steps for the pinnacle pan and cap frustum ( come across photo's for more item )
Footstep four – Slide the Lyne Arm through the hole you fabricated in the top frustum and rivet into place
Stride 5 – Rivet collar to superlative frustum
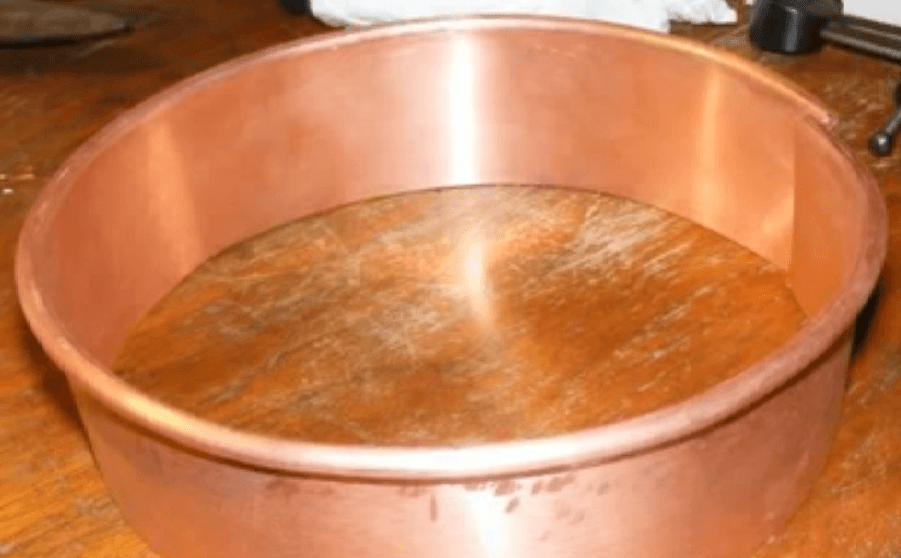
Stride vi – Assemble top and lesser frustum this is essentially the banality of the pot still.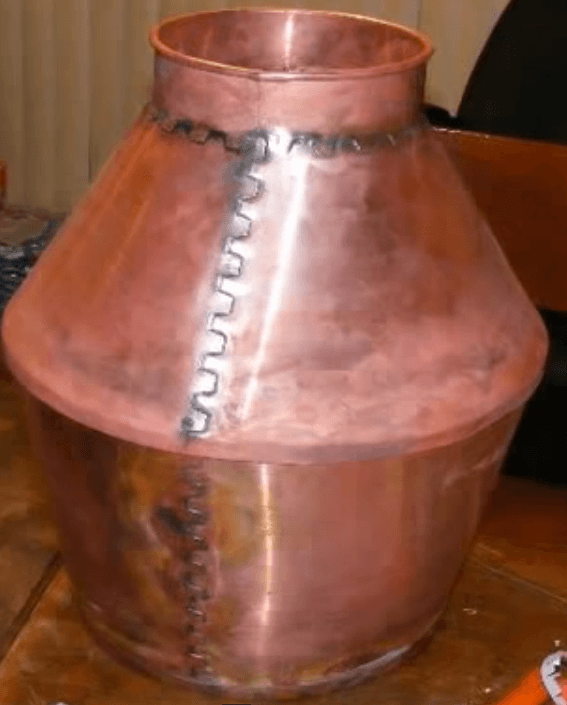
Footstep 7 – Solder all joints, make sure you don't solder the head of the still to the boiler as this needs to remain in ii pieces and then that nosotros tin clean the still afterwards it'southward used.
You've now completed edifice the pot nonetheless but we oasis't built the worm or stand nonetheless. These are required to condense the distilled product that come'southward out of the pot still.
Building the Fleck Stand and Worm for the Pot However
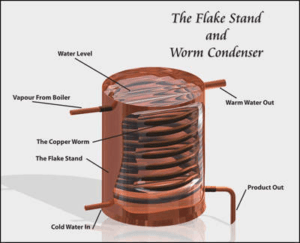 Footstep ane – Insert scrap stand wall into Scrap pan and rivet pan and vertical seam in place.
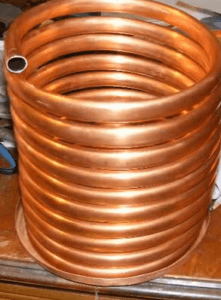
Step 2 – Using ane/4 " copper tubing make a coil so information technology fits nicely inside the pan.
Step 3 – Drill ii holes for the i/4 " copper worm. One at the summit were the worm enters the bit stand and one at the bottom where it exits. ( This may be easier to exercise before it is assembled)
Step 4 – Place the Worm inside the Bit stand allowing the ends of the worm to stick out through the holes yous just drilled. Solder these joints.
Pace five – Drill some other hole in the superlative of the Chip stand wall for a 1/2 copper pipe this will be the water outlet and ane at the bottom for a water inlet. ( Attach these to your water supply )
Footstep 6 – Insert one/two″ copper pipage to holes and solder in place.
Step seven – Solder brass fitting on the inlet side of the worm. This will attach to the terminate of the Lyne arm on the Pot nonetheless. ( see images below for more particular )
That's pretty much it I think! Below is a moving-picture show of the finished notwithstanding you lot should at present be seeing in front of you lot.
If y'all wish to u.s.a.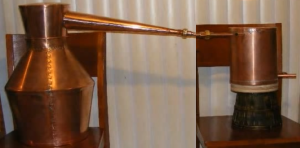 eastward this blueprint to create a larger or smaller pot even so y'all tin can alter the size of the original template by using this Scaling Chart to alter the size of your design.
To learn how to use this pot still to make your favorite rum or whiskey head on over to the distilling department of our blog.
If your going to build this pot nonetheless I'd love to hear from you lot post any questions you have or photo'southward of your notwithstanding you lot've built below. If you've figured out a better way to build this still make sure you let me know !
Other Still Plans You May Like :
- Boka Reflux Still Program – Consummate Pace by Step Guide
- The All-time Bootleg Reflux Still – Build Your Own All the same At Dwelling
- Simple Pot Still Plan – Great experiment to get you started
Source: https://learntomoonshine.com/traditional-kentucky-pot-still-plans-learn-how-to-build-a-pot-still-at-home/
0 Response to "How To Build A 20 Gallon Copper Still"
Post a Comment